January 2026 - Sock Plush
- Reading Time with the Queens
- Jan 6
- 3 min read


Happy New Year from Craft Corner!
To start off our 2026 year of programs, Reading Time is celebrating our oldest childhood friends: Plush Pals! Just like us, plushies/stuffies/teddies come in many different shapes and sizes. And with our imaginations, they can be as real as we want them to be.
Surprise! We are making our own Plush Pal this month! You can make a little plush friend out of many different things, including the way will be making ours... with a sock! This idea comes to us from a video made by DIY Crafts.
🧸Sock Plush🧸

SUPPLY LIST
🐰 Small sock
🐰 Uncooked rice
🐰 Poly-fil stuffing
🐰 Rubber band
🐰 Tiny hair tie
🐰 Sharpie marker
🐰 Scissors
🐰 Ribbon
🐰 Tall cup and a small scoop are suggested for easier construction

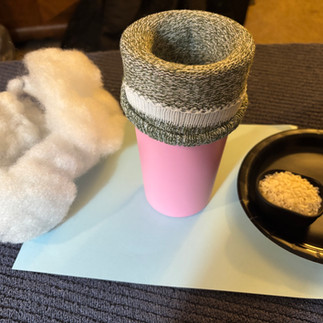


Step 1:
Place the sock inside the cup and roll the top over the rim of the cup. This will keep the sock open so you can add the rice and poly-fil. Add rice first to act as weight in the bottom, then push in the stuffing. The amounts you will add depend on the size of sock that you use. Pull the sock out periodically to check how full it is: you will want it stuffed about 3/4 of the way to the sock heel.

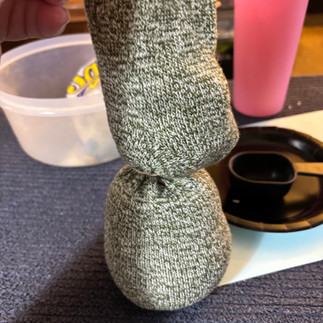
Step 2:
Wrap the rubber band tightly to close the opening, as shown in the picture.


Step 3:
If you can, squeeze the sock back into the cup, but it will likely be too bulbous to fit again. You may need a helper to hold the sock open as you add more rice and stuffing for the next section. Don’t use too much rice! It makes the head section too heavy. As you are filling, maneuver stuffing into the sock heel: this will be the face.
When you feel like it’s done, close off the opening with a smaller rubber band or hair tie. A big rubber band may cause the head to be too floppy.

Step 4:
Tie a ribbon around the neck. We used 3/8-inch ribbon. Leave enough length so you can tie a bow before you cut.


Step 5:
Time to make the ears! Lay the sock out on a flat surface and straighten out the cuff of the sock. Cut down the center of the sock. Use the marker to make guide lines in a curved shape and cut along the lines. Make little snips to correct the ear shape to your liking.

Step 6:
Use the marker to make the face. We went simple with an "X" for the nose and dark circles for the eyes. But, you could use others shapes for the nose like a triangle or circle. You could also get fancy and glue on buttons, google eyes, or felt. You could even glue a big, fluffy pom-pom for a cotton tail!

And there we are! A new friend. What do you think we should name ours? What will you name yours? Ask your adult to post your creation on social media and tag us @ReadingTimeWithTheQueens or email a picture to info@readingtimewiththequeens.com
We will have all the stuff ready to help you make this craft at our program this Saturday, January 10th.
IDAHO FALLS:
We will be at The Heart Event Center, 751 S Capital Ave, starting at 10:30am.
POCATELLO:
We will be at Discovery Dance School, 310 E Clark St, starting at 1:30pm.
The space is ADA compliant. You may park in the parking lot either in front of or behind the studio.
Love,
Miss Barb 💜


Comments