April 2026 - Thy Own Trinket Bag
- Reading Time with the Queens
- Apr 7
- 3 min read


Greetings and salutations! 'Tis I, Miss Barb.
This month we are collaborating with the local chapter of the Society for Creative Anachronism. If you want to learn more about SCA, you can visit their national organization's website or our local shire's website. They are a friendly group of people who spend time learning about and appreciating the cultures and technologies of the Medieval period!
Our craft this month is inspired by something they would have made in ye olden days: a bag! This is a simple design you can also make from a fabric circle, a piece of cording, and a little creativity. Let us go forth and discover this craft!
⚔️Thy Own Trinket Bag⚔️

⚔️ SUPPLY LIST
🗡️Felt sheet, 9x12 inches
🗡️Scissors
🗡️Pen
🗡️Black marker
🗡️Rattail cording, 36 inches
🗡️Plastic needle
🗡️Tape measure
🗡️Seam ripper
🗡️ Miscellaneous trinkets
🗡️9 inch circle, pattern download from Craft Your Happiness


⚔️ Steps 1-4
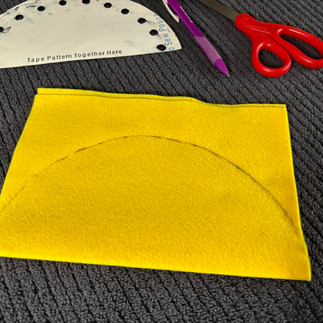
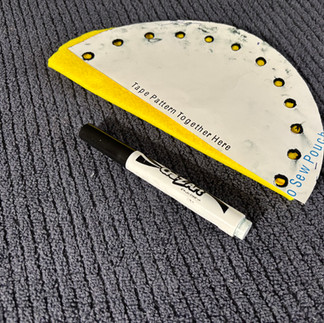
1. The larger pattern in the link above prints out in two halves. I used just one half and placed it on the fold of the felt to get a full 9-inch circle. Use a hole punch to pop out the holes on the paper pattern.
2. Fold the felt in half. Place the straight edge on the fold. Use the pen to trace around the circular edges. Use the black marker to mark the holes.
3. Carefully cut along the pen line.
4. Don’t open the circle yet! Turn over the felt piece, set the pattern back over it, then use the marker to mark the rest of the holes.


⚔️ Steps 5-6
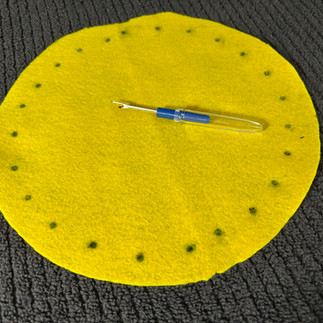
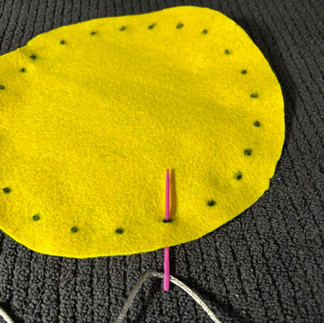
5. With adult supervision, carefully insert the point of the seam ripper into one of the black dots and make a tiny rip. This step will create and opening in the felt for the needle/cording to fit through. Do this to all of the marked dots.
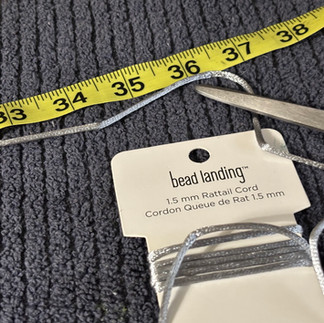
6. Measure and cut out 36 inches of cording.


⚔️ Steps 7-8
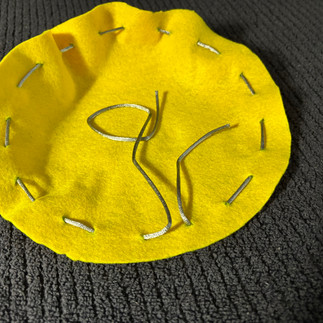
7. Thread the cording into the needle eye.
8. Lay the felt down flat. Poke the needle up from the bottom, then pull the cording through leaving a 3-4 inch tail. Continue along by poking the needle down from the top, pulling the cord until it lays flat from the previous stitch. Keep going up / down / up / down until all the dots have been used.


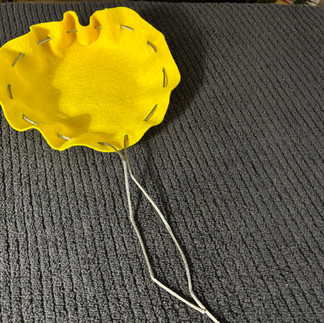
9. Remove the needle and set it aside. Lay the felt circle out, then wiggle and adjust the cording to get the ends even. Be careful not to pull any of the stitches out.


10. The pouch is finished! Add any trinkets you might have. Pull the cording to close the pouch. You can tie the cord closed or wind it around once before tying. You can carry the pouch or even tie it to your belt loop!
We all have times when we find little treasures or are given special trinkets to carry around. This is one of the pieces of technology that people in the Medieval period used to store things, and now you can use it too! If you come to Reading Time this Saturday, not only will you be able to make a bag, we will have some trinkets to share as well!
Hark! Join us for Ye Olde Creativity on Saturday, April 11th.
IDAHO FALLS:
We will be at The Heart Event Center, 751 S Capital Ave, starting at 10:30am.
POCATELLO:
We will be at Discovery Dance School, 310 E Clark St, starting at 1:30pm.
The space is ADA compliant. You may park in the parking lot either in front of or behind the studio.
Love,
Miss Barb 💜


Comments